Table of Contents
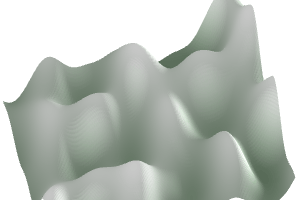
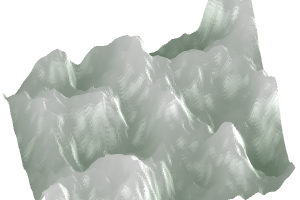
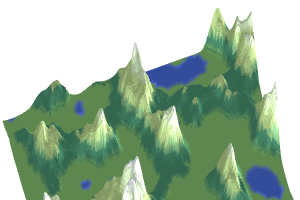
One of the more popular pages on my site is about polygonal map generation[1]. Making those maps was a lot of work. I didn’t start there. I started with something much simpler, which I’ll describe here. The simpler technique can make maps like this in under 50 lines of code:

I’m not going to explain how to draw these maps; that’s going to depend on your language, graphics library, platform, etc. I’m only going to explain how to fill an array with height and biome map data.
Noise#
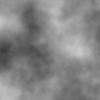
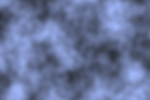
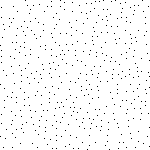
A common way to generate 2D maps is to use a bandwidth-limited gradient noise function, such as Simplex or Perlin noise, as a building block. This is what the noise function looks like:

We assign each location on the map a number from 0.0 to 1.0. In this image, 0.0 is black and 1.0 is white. Here’s how to set the color at each grid location in C-like syntax:
for (int y = 0; y < height; y++) {
  for (int x = 0; x < width; x++) {
    double nx = x/width - 0.5, ny = y/height - 0.5;
      value[y][x] = noise(nx, ny);
  }
}
The loop will work the same in Javascript, Python, Haxe, C++, C#, Java, and most other popular languages, so I’ll show it in C-like syntax and you can convert it to the language you’re using. In the rest of the tutorial, I’ll show how the loop body (the value[y][x]=… line) changes as we add more features. At the end, I’ll show a complete example.
Depending on the library you use, you may have to shift or multiply the values you get back to fit into the 0.0 to 1.0 range. Some libraries return 0.0 to 1.0; some return -1.0 to +1.0; some return other ranges like -0.7 to +0.7. Some don’t say what they return, so you may have to look at the return values to figure out the range.
Elevation#
Noise by itself is just a bunch of numbers. We need to assign meaning to it. The first thing we might think of is to make the noise correspond to elevation (also called a “height map”). Let’s take the noise from earlier and draw it as elevation:

The code is almost the same, except for what’s inside the inner loop; it now looks like this:
elevation[y][x] = noise(nx, ny);
Yes, that’s it. The map data is the same, but now I call it elevation instead of value.
Lots of hills, but not much else. What’s wrong?
Frequency#
Noise can be generated at any frequency. I’ve only picked one frequency so far. Let’s look at the effect of frequency. Try moving the slider to see what happens at different frequencies:


frequency=
It’s just zooming in and out. That doesn’t seem very useful at first glance, but it is.
elevation[y][x] = noise(frequency * nx, frequency * ny);
It’s sometimes useful to think of wavelength, which is the inverse of frequency. Frequency is measured in oscillations per distance. Doubling the frequency makes everything half the size. Wavelength is measured in distance per oscillation, measured in pixels or tiles or meters etc. Doubling the wavelength makes everything twice the size. Wavelength is related to frequency: wavelength = map_size / frequency.
elevation[y][x] = noise(x / wavelength, y / wavelength);
I have another tutorial that explains the concepts: frequency, wavelength, amplitude, octaves, pink and blue and white noise, etc.
Octaves#
To make the height map more interesting we’re going add noise at different frequencies:
 +
+
 +
+
 =
=
elevation[y][x] =    1 * noise(1 * nx, 1 * ny);
                +  0.5 * noise(2 * nx, 2 * ny);
                + 0.25 * noise(4 * nx, 4 * ny);
Let’s mix big low frequency hills and small high frequency hills into the same map. Move the slider to add smaller hills to the mix:


Now that looks a lot more like the fractal terrain we want! We can now get hills and rugged mountains, but we still don’t get flat valleys. We need something else for that.
There’s a potential problem though. Since noise can go from 0 to 1, the sum 1 * noise() + 0.5 * noise() + 0.25 * noise() can go from 0 to 1.75. The numbers [1, 0.5, 0.25] are called the amplitudes. The simplest thing to do is to divide by the sum of amplitudes:
             e  =    1 * noise(1 * nx, 1 * ny);
                +  0.5 * noise(2 * nx, 2 * ny);
                + 0.25 * noise(4 * nx, 4 * ny);
elevation[y][x] = e / (1 + 0.5 + 0.25);
In practice, you may want to experiment to find the best divisor. Although the sum of amplitudes guarantees the elevation stays in the range 0–1, the elevation values may not be distributed the way you want.
Amplitudes are commonly set to be an array [1, 1/2, 1/4, 1/8, 1/16, …], where each amplitude is ½ the previous one. This ratio is called gain or persistence. However we’re not limited to using a fixed ratio. I use amplitudes [1, 1/2, 1/3, 1/4, 1/5] for many examples on this page to bring out more fine detail than the conventional amplitudes would do. Amplitudes can also be calculated dynamically, either from previous noise values (e.g. octave 1’s noise can affect octave 2’s amplitude), or by using an independent noise field, or by using player/simulation data.
Another possible issue: by using noise(1 * nx, 1 * ny) and noise(2 * nx, 2 * ny) and noise(4 * nx, 4 * ny), what happens when nx and ny are near 0? These noise values are correlated. To get the best results we want these to be independent. If your noise library allows seeding, you can use separate seeds for each of the octaves. If it does not allow seeding, you can add an offset to each of the octaves, such as noise(1 * nx, 1 * ny) and noise(2 * nx + 5.3, 2 * ny + 9.1) and noise(4 * nx + 17.8, 4 * ny + 23.5). That way each octave is sampling from different parts of the noise space and they will be independent instead of correlated. And yet another possible issue: these noise values may be aligned along the same directions, which can sometimes cause visible artifacts, especially when using Perlin noise. To reduce this, rotate the output of some of the octaves, or switch to Simplex noise.
Redistribution#
The noise function gives us values between 0 and 1. To make flat valleys, we can raise the elevation to a power. Move the slider to try different exponents.
e =    1 * noise(1 * nx, 1 * ny);
  +  0.5 * noise(2 * nx, 2 * ny);
  + 0.25 * noise(4 * nx, 4 * ny);
e = e / (1 + 0.5 + 0.25);
elevation[y][x] = Math.pow(e, exponent);
Higher values push middle elevations down into valleys and lower values pull middle elevations up towards mountain peaks. We want to push them down.
In practice it may work better to use Math.pow(e * fudge_factor, exponent), where the fudge factor is some number near 1. For the above demo I used 1.2. Try different values and see what works best for you.
The pow() function is only one way to reshape the elevations. There are many other functions you can try. You aren’t limited to mathematical functions; consider drawing curves yourself, like the “curves” tool in a photo editor.
Now that we have a reasonable elevation map, let’s add some biomes!
Biomes#
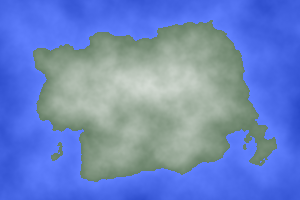
Noise gives us numbers but we want a map with forests, deserts, and oceans. The first thing to do is to make low elevations into water:
water=
function biome(e) {
    // a threshold between 0.2 and 0.5 work well in the demo
    // but each generator will need its own parameter tuning
    if (e < waterlevel) return WATER;
    else return LAND;
}
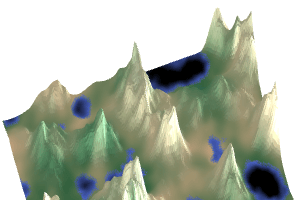
Hey, that’s starting to look like a procedurally generated world! We have water, grass, and snow. What if we want more things? Let’s make the sequence water, beach, grassland, forest, savannah, desert, snow:
function biome(e) {
  // these thresholds will need tuning to match your generator
  if (e < 0.1) return WATER;
  else if (e < 0.2) return BEACH;
  else if (e < 0.3) return FOREST;
  else if (e < 0.5) return JUNGLE;
  else if (e < 0.7) return SAVANNAH;
  else if (e < 0.9) return DESERT;
  else return SNOW;
}
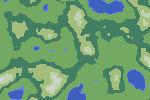
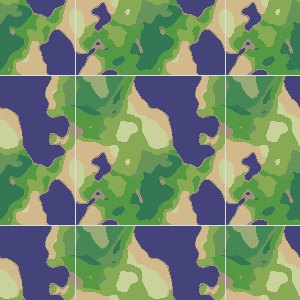
Hey, looks cool! You’ll want to change the numbers and biomes for your game. Crysis will have more jungles; Skyrim will have more ice and snow. But no matter what you change the numbers to, this approach is a bit limited. The terrain types line up with the elevations, so they form bands. To make it more interesting, we need to choose biomes with something other than elevation. Let’s create a second noise map for “moisture”:

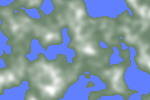
Now let’s use both elevation and moisture. In the diagram on the left below, the y-axis is the elevation (first diagram above) and the x-axis is the moisture (second diagram above). It produces a reasonable looking map:

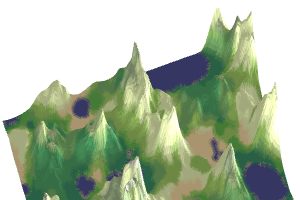
Low elevations are oceans and beaches. High elevations are rocky or snowy. In between we get a wide range of biomes. The code looks like this:
function biome(e, m) {
  // these thresholds will need tuning to match your generator
  if (e < 0.1) return OCEAN;
  if (e < 0.12) return BEACH;

  if (e > 0.8) {
    if (m < 0.1) return SCORCHED;
    if (m < 0.2) return BARE;
    if (m < 0.5) return TUNDRA;
    return SNOW;
  }

  if (e > 0.6) {
    if (m < 0.33) return TEMPERATE_DESERT;
    if (m < 0.66) return SHRUBLAND;
    return TAIGA;
  }

  if (e > 0.3) {
    if (m < 0.16) return TEMPERATE_DESERT;
    if (m < 0.50) return GRASSLAND;
    if (m < 0.83) return TEMPERATE_DECIDUOUS_FOREST;
    return TEMPERATE_RAIN_FOREST;
  }

  if (m < 0.16) return SUBTROPICAL_DESERT;
  if (m < 0.33) return GRASSLAND;
  if (m < 0.66) return TROPICAL_SEASONAL_FOREST;
  return TROPICAL_RAIN_FOREST;
}
These are example threshold numbers. In every project I’ve worked on I’ve had to change them, not only for predominant biomes (Dagobah will have more swamp, Hoth will have more tundra, Tatooine will have more desert) but also because it depends on the noise library being used and how the octaves are mixed together. Plan to tweak these numbers!
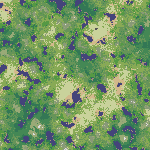
Alternatively if you don’t need biomes, smooth gradients (see cartographer Tom Patterson’s article[2]) can produce colors:

With either biomes or gradients, one noise value doesn’t produce enough diversity, but two is pretty good. Two is what ecologist Robert Whittaker[3] used when he was studying biomes.
Climate#
In the previous section I used elevation as a proxy for temperature. Higher elevations have lower temperatures. However, latitude also affects temperatures. Let’s use both elevation and latitude to control temperature:
equator: hot cold
poles: hot cold
Near the poles (high latitudes) the climate is colder, and on the tops of mountains (high elevations) the climate is also colder. Start with elevation e. Then modify it to an “equivalent” elevation. For this demo I used equivalent_elevation = 10*e*e + poles + (equator-poles) * sin(PI * (y / height)), and then I used equivalent_elevation instead of e to calculate biomes. I don’t think this is the best approach; I think you’ll need to experiment with formulas and tweak the parameters to make this work the way you want.
There’s also a seasonal variation of climate. In summer and winter the northern and southern hemispheres get warmer and colder, but the equator doesn’t change as much. There’s lots more that can be done here, such as modeling prevailing wind and ocean currents and the biome’s effect on climate and the ocean’s moderating effect on temperatures.
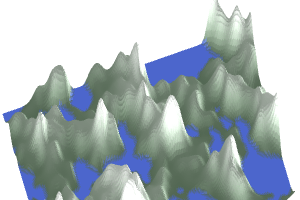
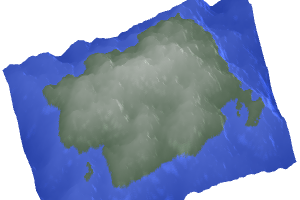
Islands#
For some projects I want the boundaries of the map to be water. One way to do this is to generate a map as above and then reshape it. Looking from the side, what is stopping the map from being an island? The border areas that are on land need to be pushed down into water, and the center areas that are in water need to be pushed up to become land.
How does this work? There are two ingredients:
- A distance function assigns a distance to every position on the map, from 0 at the center to 1 at the border.
- A shaping function (as used in the Redistribution section) takes an elevation as input and chooses a new output elevation.
At the center of the map (distance 0), we’ll use a shaping function that always outputs land. At the border of the map (distance 1), we’ll use a shaping function that always outputs water. In between, we’ll allow both land and water. For simplicity, I’ll assume the water level is 0.5, so ≥0.5 means land and <0.5 means water.
To calculate the distance d, set nx = 2*x/width - 1 and ny = 2*y/height - 1. These will range from -1 to +1. Then choose one of these distance functions recommended by /u/KdotJPG[4]:
- Square Bump
-
d = 1 - (1-nx²) * (1-ny²), when you have a square map and want to make the island fill as much of the space possible without reaching the borders. - Euclidean²
-
d = min(1, (nx² + ny²) / sqrt(2)), when you want the island to be round, and plan to embed it in a larger world.
The simplest way to shape the elevation e is to linearly mix in 1-d.
At the center of the map, d is 0, and we want the elevation to be high (1).
At the edges of the map, d is 1, and we want the elevation to be low (0).
Linear interpolation can do this: e = lerp(e, 1-d, mix),
for some value of mix between 0 and 1.
Move the mix slider to 0 to see the original map and move it to 1 to see the constraining shape.
mix parameter:
Distance function:
0 for original, ½ for islands:
There are many more things to try.
Try shifting the distance function up or down by adding a constant, or slope it more or less by multiplying by a constant, or change the exponent from 2 to 4 or 6.
Try applying the elevation reshaping to only the lower frequency octaves of the noise generator, and allow the high frequencies to work equally across the map. Try choosing the amount of land area you want, and then push all elevations up or down until you get the desired island size.
Try using noise to create the island shape but use some other approach to assign the elevation.
Try using a lookup table to allow arbitrary (piecewise linear) reshaping or distance functions. It will take some experimentation to find a combination you like.
Try non-linear shaping functions to mix e and 1-d.
Ridged noise#
Instead of raising the elevation to a power, we can use absolute value to create sharp ridges:
function ridgenoise(nx, ny) {
  return 2 * (0.5 - abs(0.5 - noise(nx, ny)));
}
To add octaves, we can vary the amplitudes of the higher frequencies so that only the mountains get the added noise:
e0 =    1 * ridgenoise(1 * nx, 1 * ny);
e1 =  0.5 * ridgenoise(2 * nx, 2 * ny) * e0;
e2 = 0.25 * ridgenoise(4 * nx, 4 * ny) * (e0+e1);
e = (e0 + e1 + e2) / (1 + 0.5 + 0.25);
elevation[y][x] = Math.pow(e, exponent);

n=
I don’t have much experience with this technique and will have to play with it more to learn how to use it well. It might also be interesting to mix ridged low frequency noise with non-ridged high frequency noise.
Terraces#
If we round the elevation to the nearest of levels we get terraces:

n=
This is an application of elevation redistribution functions of the form e = f(e). Earlier we set e = Math.pow(e, exponent) to make mountain peaks steeper; here we use e = Math.round(e * ) / to make terraces. By using a function other than a step function[5] the terraces can be rounder or only occur at some elevations.
Tree placement#
We usually use fractal noise for elevation and moisture, but it can also be used for placing irregularly spaced objects like trees and rocks. For elevation we have higher amplitudes with lower frequencies (“red noise”). For object placement we want to use higher amplitudes with higher frequencies (“blue noise”). On the left is a blue noise pattern; on the right are the locations where the noise is greater than the nearby values:
R=
for (int y = 0; y < height; y++) {
  for (int x = 0; x < width; x++) {
    double nx = x/width - 0.5, ny = y/height - 0.5;
    // blue noise is high frequency; try varying this
    bluenoise[y][x] = noise(50 * nx, 50 * ny);
  }
}

for (int yc = 0; yc < height; yc++) {
  for (int xc = 0; xc < width; xc++) {
    double max = 0;
    // there are more efficient algorithms than this
    for (int dy = -R; dy <= R; dy++) {
      for (int dx = -R; dx <= R; dx++) {
        int xn = dx + xc, yn = dy + yc;
        // optionally check that (dx*dx + dy*dy <= R * (R + 1))
        if (0 <= yn && yn < height && 0 <= xn && xn < width) {
          double e = bluenoise[yn][xn];
          if (e > max) { max = e; }
        }
      }
    }
    if (bluenoise[yc][xc] == max) {
      // place tree at xc,yc
    }
  }
}
KDotJPG recommends checking dx*dx + dy*dy <= R * (R + 1) to change the square overlap check to a circular overlap check, and also to allow non-integer radius values.
Also consider that the radius doesn’t have to be a constant. By choosing a different R for each biome we can get a variable density of trees:


Although it’s cool that Simplex/Perlin noise can be used to place trees, other algorithms are more efficient and produce a better distribution of trees. For trees and other object placement, I recommend using Poisson Disc[6] or a jittered grid instead of high frequency Simplex/Perlin noise as shown here. For Javascript, I use poisson-disk-sampling[7], fast-2d-poisson-disk-sampling[8], or jittered-hexagonal-grid-sampling[9]. Wang tiles and graphics dithering algorithms are also worth a look.
Wraparound maps#
Sometimes we want the east edge of the map to match up with the west edge. This corresponds to a cylinder in 3D space. We can implement this with a minor change. We’ll interpret the x value on the flat map as an angle in the cylinder world. Then we convert the angle to cartesian coordinates. To also make the north and south edges match up, we can apply the same pattern again to turn the y value into an angle, and look things up in a 4D noise space. Let’s see how the maps look adjacent to copies of themselves:

The first one wraps east-west but not north-south. The second one wraps in all four directions. Here’s some code:
const TAU = 2 * M_PI;

function cylindernoise(double nx, double ny) {
    double angle_x = TAU * nx;
    /* In "noise parameter space", we need nx and ny to travel the
       same distance. The circle created from nx needs to have
       circumference=1 to match the length=1 line created from ny,
       which means the circle's radius is 1/2π, or 1/tau */
    return noise3D(cos(angle_x) / TAU, sin(angle_x) / TAU, ny);
}

function torusnoise(double nx, double ny) {
    double angle_x = TAU * nx,
           angle_y = TAU * ny;
    return noise4D(cos(angle_x) / TAU, sin(angle_x) / TAU,
      cos(angle_y) / TAU, sin(angle_y) / TAU);
}
In practice, you will probably have to scale these noise values up. Higher dimensional noise tends to have a narrower range of values than lower dimensional noise, so if your biome constants are tuned for 2D noise, then you can try multiplying noise3D by √1.5, and noise4D by √2, but you may have to tweak these values further to match your needs. See Rudi Chen’s article on Perlin Noise range[10]. For more on tileable noise, see Ron Valstar’s guide[11].
Another thing that may affect the quality is that the octaves may “bleed” into each other’s frequency ranges, according to the paper Wavelet Noise[12] by Cook and DeRose:
When rendering, it is common to texture 2D surfaces by sampling a 3D noise function, but the resulting 2D texture will in general not be band-limited, even if the 3D function is perfectly band-limited.
To infinity and beyond#
The calculation of the biome at position (x,y) is independent of calculations at any other position. This local calculation results in two nice properties: it can be calculated in parallel, and it can be used for infinite terrain. Put the mouse over the minimapTouch the minimap on the left to generate a map on the right. We can generate any part of the map without generating (or having to store) the whole thing.

How can you do this in your own code? It’s a small change to the code we’ve already been using. Find the places where you have calls to noise(…, …) and replace them by noise(… - camera.x, … - camera.y). In my demo, I use the mouse position to set camera.x and camera.y but you might use W A S D or other controls to move the camera around your infinite map.
Implementation#
Using noise for generating terrain is a popular technique, and you can find tutorials for many different languages and platforms. The map generation code is pretty similar across languages. Here’s the simplest loop, in three different languages:
-
Javascript:
import { createNoise2D } from 'simplex-noise'; let gen = createNoise2D(); function noise(nx, ny) { // Rescale from -1.0:+1.0 to 0.0:1.0 return gen(nx, ny) / 2 + 0.5; } let value = []; for (let y = 0; y < height; y++) { value[y] = []; for (let x = 0; x < width; x++) { let nx = x/width - 0.5, ny = y/height - 0.5; value[y][x] = noise(nx, ny); } } -
C++:
module::Perlin gen; // if using libnoise double noise(double nx, double ny) { // if using libnoise // Rescale from -1.0:+1.0 to 0.0:1.0 return gen.GetValue(nx, ny, 0) / 2.0 + 0.5; } FastNoiseLite gen; // if using fastnoiselite double noise(double nx, double ny) { // if using fastnoiselite // Rescale from -1.0:+1.0 to 0.0:1.0 return gen.GetNoise(nx, ny) / 2.0 + 0.5; } double value[height][width]; for (int y = 0; y < height; y++) { for (int x = 0; x < width; x++) { double nx = x/width - 0.5, ny = y/height - 0.5; value[y][x] = noise(nx, ny); } } -
Python:
from opensimplex import OpenSimplex
gen = OpenSimplex()
def noise(nx, ny):
    # Rescale from -1.0:+1.0 to 0.0:1.0
    return gen.noise2d(nx, ny) / 2.0 + 0.5

value = []
for y in range(height):
    value.append([0] * width)
    for x in range(width):
        nx = x/width - 0.5
        ny = y/height - 0.5
        value[y][x] = noise(nx, ny)
Once you have a noise library, the code is similar. Beware: some libraries combine multiple octaves automatically, which is convenient but makes it hard to mix them in your own way.
- Python: opensimplex for Python[13]
- C++: SimplexNoise[14] or FastNoiseLite[15] or libnoise[16]
- Javascript, Typescript: simplex-noise.js[17] or FastNoiseLite[18]
- Java, C#: opensimplex2[19] or FastNoiseLite[20]
- Unity: Unity.Mathematics.noise[21] or Mathf.PerlinNoise[22]
There are lots of noise libraries for most popular languages. Alternatively, you may want to spend time studying how Simplex/Perlin/OpenSimplex noise works, or implementing it yourself. I didn’t. I used the existing libraries. FastNoiseLite[23] in particular is available for C, C#, C++, Java, JavaScript, Rust, Go, GLSL, HLSL, Fortran, Zig, Odin, Haxe, Pascal, GML, and even PowerShell.
Once you have found a noise library for your favorite language, the details will vary (some will return numbers from 0.0 to 1.0 and others from -1.0 to +1.0) but the basic idea is the same. For a real project you may want to wrap the noise function and the gen object into a class but those details aren’t relevant here so I made them global.
For this simple project it doesn’t matter that much whether you use Simplex noise, OpenSimplex noise, Perlin noise, value noise, midpoint displacement, diamond square[24] displacement, or an inverse Fourier transform. There are pros and cons of each of these but they all produce similar enough output for this type of map generator.
The drawing of the map is going to be platform-specific and game-specific so I’m not providing that; this code is to generate the elevations and biomes, which you’ll want to draw yourself in whatever style your game uses. Feel free to copy, port, and use it for your own projects.
Playground#
I’ve covered mixing octaves, raising the elevation to a power, and combining elevation and moisture to pick a biome. Here’s an interactive diagram that lets you play with all of these parameters, and then shows how the code is put together:
import alea from 'alea';
import { createNoise2D } from 'simplex-noise';
const genE = createNoise2D(alea(seed1));
const genM = createNoise2D(alea(seed2));
function noiseE(nx, ny) { return genE(nx, ny)/2 + 0.5; }
function noiseM(nx, ny) { return genM(nx, ny)/2 + 0.5; }

for (var y = 0; y < height; y++) {
  for (var x = 0; x < width; x++) {
    var nx = x/width - 0.5, ny = y/height - 0.5;
    var e = ( * noiseE( 1 * nx,  1 * ny)
           +  * noiseE( 2 * nx,  2 * ny)
           +  * noiseE( 4 * nx,  4 * ny)
           +  * noiseE( 8 * nx,  8 * ny)
           +  * noiseE(16 * nx, 16 * ny)
           +  * noiseE(32 * nx, 32 * ny));
    e = e / ( +  +  +  +  + );
    e = Math.pow(e, );
    var m = ( * noiseM( 1 * nx,  1 * ny)
           +  * noiseM( 2 * nx,  2 * ny)
           +  * noiseM( 4 * nx,  4 * ny)
           +  * noiseM( 8 * nx,  8 * ny)
           +  * noiseM(16 * nx, 16 * ny)
           +  * noiseM(32 * nx, 32 * ny));
    m = m / ( +  +  +  +  + );
    /* draw biome(e, m) at x,y */
  }
}
Adjust parameters→
exp=
e1=
e2=
e3=
e4=
e5=
e6=
m1=
m2=
m3=
m4=
m5=
m6=
A tricky bit: you need to use different seeds for the elevation and moisture noise. Otherwise they’ll end up producing the same noise values, and your maps won’t look interesting. Javascript’s simplex-noise v3 package[25] and Python’s opensimplex[26] and C++’s FastNoiseLite[27] libraries support seeds. Javascript’s simplex-noise v4 lets you plug in your own seedable random number generator. If your noise library doesn’t support seeds, an alternative to sample from a faraway space, so you might use noise2D(nx, ny) for elevation and noise2D(nx + 1000, ny) for moisture.
Another tricky bit: once you combine multiple octaves of noise, the range of output may not be what you expected, and you may have to add/multiply the output value into the desired range (such as 0.0 to 1.0). Scott Turner has written a bit more about common issues with noise[28]; Rudi Chen has analyzed the range of output for Perlin Noise[29]; and KDotJPG has studied the problem for Simplex, OpenSimplex, and Perlin Noise[30]. The simplex-noise.js library[31] I’m using takes this into account and rescales output to -1.0 to +1.0.
Thoughts#
What I like about this approach to map generation is that it’s simple. It’s fast. It’s very little code to produce decent results.
What I don’t like about this approach is that it’s limited. Local calculation means every location is independent of every other location. Different areas of the map don’t relate to each other. Every place on the map “feels” the same. There are no global constraints like “there should be between 3 and 5 lakes” or global features like a river flowing from the top of the highest peak down to the ocean. Another thing I don’t like is that it takes a lot of tweaking of parameters to get something you like.
Why do I recommend it then? I think it’s a good starting point, especially for indie games or game jams. Two of my friends wrote the initial version of Realm of the Mad God[32] in 30 days, for a game competition[33]. They asked me to help them make the maps. I used this technique (plus some extra features that turned out not to be that useful) to make a map for them. Months later, after getting feedback from players and looking at the game design a lot more, we designed the more advanced map generator using Voronoi polygons, described here[34]. That map generator doesn’t use the techniques from this page, but uses noise very differently to produce maps.
Noise-based elevation is fun and easy to get started with but you can quickly run into limits. Scott Turner has an insightful essay with reasons to use alternatives[35]. Artifexian’s video on coastlines[36] gives a sense of just how limited noise-based terrain is.
More#
There are lots of cool things you can do with noise functions. My page introduces the basics. Search the web you’ll see more advanced techniques such as turbulence, billow, ridged multifractal, amplitude damping, terraced, voronoi noise, analytical derivatives, domain warping, and others. Take a look at Inigo Quilezs’s page[37] for inspiration. Runevision shows how to use exponents, voronoi, sine waves, shaping functions, directional noise, gradients, fades, ridges, layers to create pseudo-erosion[38].
My previous map generation projects that influenced this one:
- I used generic Perlin noise for my first Realm of the Mad God map generator[39]. We used that for the first six months of alpha testing, and then replaced it with a custom-designed Voronoi polygon map generator[40] based on the gameplay needs we identified during the alpha testing. The biomes in this article and their colors come from those projects.
- While studying signal processing for audio, I wrote a tutorial on noise that covers concepts like frequency, amplitude, octaves, and “colors” of noise. The same concepts that work for audio also apply to noise-based map generation. I made some unpolished terrain generation demos at the time but never finished them.
- Sometimes I experiment to find limits. I wanted to see how little code I could get away with while still producing reasonable maps. In this mini-project I got down to zero lines of code— it’s all image filters (turbulence, threshold, color gradients). I was both pleased and disturbed by this. How much of map generation can be done with image filters? Quite a lot. Everything in the “smooth gradient color scheme” I described earlier came from this experiment. The noise layer is a turbulence image filter; the octaves are images layered on top of each other; the exponent is called the “curves adjustment” tool in Photoshop.
It bothers me somewhat that most of the code we game developers write for noise-based terrain generation (including midpoint displacement) turns out to be the same as audio and image filters. On the other hand, it produces decent results with very little code, so that’s why I wrote the article you’re reading. It’s a quick & easy starting point. I usually don’t use these types of maps for long; I’ll replace them with a custom map generator once more of the game is built and I have a better sense of what types of maps best match that game’s design. That’s a common pattern for me: start with something extremely simple, then replace it only after I better understand the system I’m working on.
There are a lot of cool things you can do with noise, and I’ve barely explored them here. Try out the Noise Studio[41] to interactively explore lots of possibilities. Also:
- Inigo Quilezles[42], a must read
- Sharing everything I could understand about gradient noise[43] is a great explanation of how Simplex/Perlin noise work
- Building Worlds Using Maths[44] - Sean Murray of No Man’s Sky; skip to 20 minutes in.
- Continuous World Generation in No Man’s Sky - Innes McKendrick[45]
- Noise functions for Factorio’s maps[46]